How to make Keppai Puttu – Puttu Recipe & Video
[youtube=http://www.youtube.com/watch?v=S8JZC1vQikA\] [Watch in “Full Screen” mode. Make sure you do not move your mouse often in order to read the recipe instructions clearly. Few text remain hidden under the seek panel so avoid to mouse-over the player]

If my ammachi (maternal grandmother) is the Queen of Bajji making , my appatha (paternal grandma) is the Queen of Queens in making Paniyarams  . Chicken dishes means to refer ammachi’s recipes, mutton dishes means to refer appatha’s recipes. In that way, if white rice puttu is a usual breakfast item in my ammachi veedu, wheat puttu and this raagi puttu are done often in my appatha veedu. Dad and I like kodhumai puttu (wheat puttu) so very much that if somebody watches us me while eating kothumai puttu, their brain will do a quick pattern search and match me with some hungry hen that pecks its grains in no time. Now, that does not mean I will humbly say a ‘no-thanks’ if somebody serve me a plate full of arisi puttu (rice puttu) or this keppai puttu (millet puttu)
  . So you get the idea? that I’m all for EATING puttu?
Before moving on to the puttu recipe, some ‘walk-the-post’ talks. You can make/steam puttu even if you do not have a puttu maker / puttu kutti like how I made my Wheat Puttu and Rice Puttu. At home we never had any special vessel like puttu cooker for steaming puttu. We’ve always made puttu using our idli vessel (idli pot/idli cooker). I was curious to try steaming puttu in the traditional puttu kudam, so asked my neighbor Sham if she had any. She had no puttu kodam but had this cheratta puttu kutti. She quickly showed me how to use this chiratta puttu maker.

Of course, using this cute puttu maker is not big rocket science  . But I would like to explain it to help those who are beginners in puttu making process. This cherattai puttu vessel has a lid with 3 holes, a perforated plate and a small hole in the vessel. The small hole beneath the puttu kutti is the canal through which steam enters into the vessel to cook the puttu. The steam then escapes out through the holes on the lid. Place the perforated plate over the hole (such that the center of the plate closes the hole). The perforated plate helps to distribute the steam uniformly inside the vessel. Got it?
  Good, now our puttu vessel is set. Keep it aside. We’ll move on to check “how to prepare the raagi flour to get real soft textured puttu”.

How to make Ragi Puttu (Keppai Puttu) – with step by step pictures AND VIDEO [Each image can be enlarged if Clicked]
Step 1. [Optional]
[It is not necessary to roast the ragi flour to make puttu. But if you are making arisi puttu / rice flour puttu or gothumai puttu / wheat flour puttu, it is necessary to roast the flour until aroma spreads the kitchen and the flour becomes sandy in texture.] Keep a dry wok/kadaai on the stove in Medium flame. Once the wok gets heated change flame to LOW. Add the flour and start to stir the flour continuously. Do not leave the flour unattended because flour will easily get burnt. The aim in this step is to heat up the flour uniformly and thoroughly. So keep stirring and roasting the flour in LOW flame for 10 minutes. By this time, flour will release its aroma. Switch off stove and remove the wok from stove. Keep stirring the flour for 2 more minutes and then set aside. Do not touch, the flour will be real hot. Let it cool to room temperature, may be 10 minutes.

Step 2. Take 1/2 cup of water in a vessel and add required salt [I used 1/2 tsp. salt]. Warm up the water (just slightly) in the stove for less than a minute in Medium-Low flame. Switch off the stove. We will only need < 1/2 cup of water for 1 cup of flour for making puttu. Nothing harm in having extra water, just in case. 
Step 3. Now, we need to prepare the raagi flour [keppai maavu] to reach puttu consistency. The texture of the puttu flour must neither be too spongy nor too dry like bread crumbs. The prepared puttu podi must be soft, damp and free flowing, all at the same time. If you need a_ step by step picture demo to make soft puttu podi_, then you can check that out in my Rice Puttu Recipe or Whole Wheat Flour Puttu recipe, because it’s the same process for all kinds of puttu, be it “rice puttu‘, “wheat puttu‘, “raagi puttu’ etc. Below is my video to help beginners who are trying to make puttu for the first time. Okkai, 6 minutes video is too much but I bet, you wont regret watching the video. I’ve listed all tips and tricks in the video to prepare the flour for getting soft puttu. This step will take 5 minutes for kitchen gurus but for me it takes 7-10 minutes._ [Watch in “Full Screen” mode. Make sure you do not move your mouse often in order to read the recipe instructions clearly. Few text remain hidden under the seek panel.]_
[youtube=http://www.youtube.com/watch?v=S8JZC1vQikA\]
Step 4.
Puttu podi is now ready. Now take the puttu maker/puttu kutti and start to fill it with puttu loosely. Oh, wait I forgot! Sham told me to first put a tbsp. of shredded coconut into the vessel. I forgot to do that. So please put some shredded coconut and fill the vessel with puttu [loosely, remember. Do not pack it tightly.] (For the flour amount given in the ingredients list, I was able to get two batch of puttu in this puttu vessel). Close the lid. [[Look into the 3Ts section for more tips on layering the puttu.]](#Puttu Layering “Tips for layering Puttu - step by step”) 
Step 5.
 Now we need steam to cook the puttu, right? Right. The nozzle in the pressure cooker will beautifully fit inside the hole in the puttu vessel. Pour little water inside the pressure cooker, close it with the lid, place it on the stove, set flame to high and wait for 3-5 minutes until you get steam out from the nozzle. (Fine, it’s understood that we should NOT use the cooker whistle.) You see the steam in the picture?
Step 6. Once the steam comes continuously from the pressure cooker, set the flame to LOW (sim). Take the puttu vessel and carefully place it on the nozzle, i.e. the pressure cooker’s nozzle should fit inside the hole beneath the puttu maker [hey did I just mention it is no Rocket science?! Well it does sound like launching a rocket now, doesn’t it? ]. In another 5 minutes steam will begin to come out from the holes in the puttu maker lid. The steam will also bring with it the beautiful smell of cooked puttu. Again, can you see the steam in the picture? Gently, lift the puttu vessel using its handle. Careful, it’ll be very hot. [5 minutes in SIM is more than enough to steam the puttu.]
Step 7.
 Open the puttu kutti lid and invert it on a wide-mouthed vessel. Knock down the puttu dome so that the steam escapes. Let it stay knocked down for 2-3 minutes. [You can carry on with the next batch of puttu for steaming. Check if there is enough water in the pressure cooker before proceeding with the next batch.]
Step 8.
Once some steam escapes [we need the puttu to be warm, not too hot or cold], add in the jaggery (vellam) or sugar, shredded coconut and sesame oil (nallennai/gingely oil). Mix them nicely. [I mix them with my hands.] [[Read the 3Ts section for more tips on seasoning and garnishing the puttu.]](#Puttu Layering “Tips to make tasty Puttu - Puttu Recipe - step by step pictures”) 
Step 9.
Sometimes, Amma mixes 2 tsp. of ghee (for one bowl of steamed puttu) instead of using sesame oil. This normally makes the puttu rich and filling. I follow this trick of hers when I have only little Raagi flour to prepare breakfast. Adding ghee (yes, homemade ghee of course) will make your stomach feel full after eating just one fist-full of puttu. So nobody will go for a second round . 
Step 10.
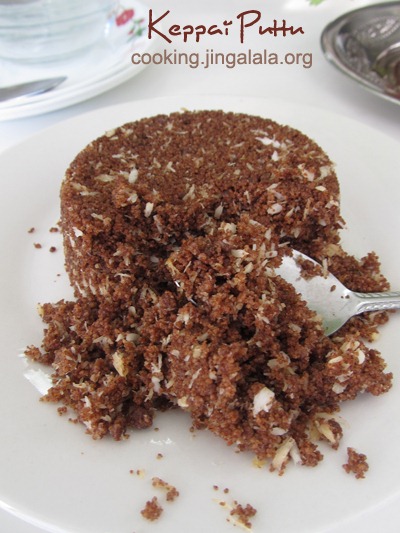
Fill in the puttu tightly in your favorite bowl to make a mould. Invert it over your plate and give two gentle knocks on the bowl. Tuppp…. falls the puttu on your plate  . Enjoy
](/images/how-to-make-puttu-kerala-puttu-south-indian-puttu-recipe-11.jpg)

3Ts [ Tips | Tricks | Tactics and Secrets ] for making Raggi Puttu (Kelvaragu Puttu/Red Millet Puttu)
- Chirattai / ‘thengaai moodi’ means coconut shell. The puttu maker (‘Chiratta Puttu Kutty’ which I used in this post) got its name from its shape. Question: If you poke one’s eyes will they help you? Ans: Yes, if that was coconut, it will . Got real coconut shells at home? Then you can try using the shell as a puttu kutty by breaking one of its eyes. Replace the coconut shell for puttu maker and use it exactly the same way described in this post.
- You can mix shredded coconut along with the flour when you sprinkle water to prepare the flour (Step. 3). Or you can layer the coconut shreds alternatively in the puttu vessel when you fill in the puttu podi [Step. 4] (like, 1 tbsp. coconut - 4 tbsp. puttu powder - 1 tbsp. coconut - 4 tbsp. puttu powder - ending with coconut). You can serve this steamed puttu without disturbing the dome-shape/cheratai shape accompanying it with kerala konda kadala curry - best suits for **White puttu (Rice puttu/Arisi maavu puttu), **but normally we do not make any curries to accompany with Ragi Puttu. We make and eat just how explained in the recipe.
- Ragi has a tad of bitterness to it. So you can use karupatti (palm sugar) instead of jaggery (vellam). Karupatti enhances the taste and flavor of the puttu.
- Ragi takes a little longer to steam unlike rice flour/wheat flour puttu. If you’re planning to make Ragi puttu in idli cooker or any steamer, steam it closed in Medium flame until steam starts to come out of the lid. Once you see steam coming out from the cooker, reduce flame to LOW and continue to cook until you smell the cooked Ragi (takes about 10 minutes or even longer).
- Do not steam Ragi in high flame for a long time. Doing so will turn it to black color and makes it to taste more bitter. So take care.
- Jeevs do not like sweetened puttu. So I make a savory version of puttu by seasoning little mustard seeds, urad dal, dry red chili, shredded coconut and curry leaves in sesame oil and mix it with the warm puttu [yeh something like idli uppuma / vaalakkai puttu]. I add a littttle (1/4 tsp.) of sugar while mixing this spicy-version of puttu [kaara puttu/urapu puttu].

Did anybody reading this page jump to conclusions that wheat, rice and ragi are the only puttu types we make in our home? There are many varieties of puttu that we make! Sooji puttu (rava puttu), kappa puttu (tapioca puttu), valakkai puttu (raw banana puttu), sora puttu etc. (probably the last two may not make to the category )). Will soon create a separate category for ‘Puttu Varieties’. [here, when I say ‘soon’, replace it with ‘sooner-or-later’.]

Again to brush up your reading on this post, I would like to remind you that I’m all for eating puttu. If am I to eat wheat puttu, I would say…’mmm… of all the puttu types, this wheat puttu is my favorite’. If am I to eat Rice Puttu, I would say…’mmm … of all the puttu types, Rice Puttu is my favorite’. I guess you know what I’d said after eating Ragi puttu. I said…. ‘mmmmnnnhh… of aaal the puttu types, THIS Raagi Puttu is my faaavvrittt’. Hm, how can I better explain you that I AM ALL for EATING PUTTU? It’s like this… suppose I’m to participate in a running race [you can imagine me standing on the track in a swim suit… oops sorry, race suit, race suit that is, with a tight pony-tail knotted high, and my nostrils flaring up with hot air… waiting restlessly for the gun shot to go 
 ] and there is someone waiting for me in the finish line with a bowl of puttu. I dare you I will win the Gold medal in the race. Can’t believe huh? Bet?

Ragi Puttu | Finger Millet Recipe
- PREP TIME: 20 min
- COOK TIME: 8 min
- TOTAL TIME: 28 min
- YIELD: 2 bowls
- DIFFICULTY: easy
- RECIPE TYPE: Breakfast/Snacks
Ingredients:
- Ragi flour [Keppai / Kelvaragu maavu] – 1 cup
- Water – 1/2 cup
- Salt – 1/2 tsp.
- Jaggery [Vellam] or Sugar – 1 tbsp.
- Sesame oil (Gingely oil / Nallennai) or Ghee – 2 tsp.
- Shredded coconut (fresh or frozen) – 1/2 cup
Mangala from Cooking.Jingalala.Org Eat Well!